background wallpaper

Monday, January 20, 2014

Installing removable patio supports

This is how I put in my patio supports.  First a quick explanation on the difference between a patio and a loft.  They are pretty much the same thing, only a patio is placed above the ground level 1/2 a grid high up. It doesn't require extra grids or a second higher level like a loft does.  

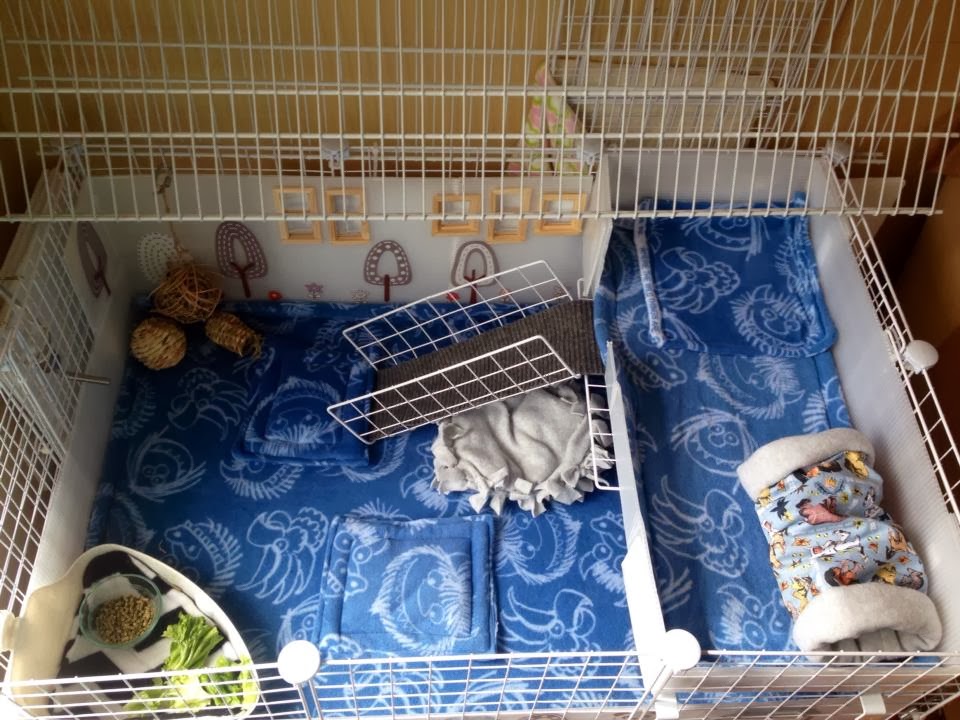
My cage has a patio. It starts with support bars to hold up the patio. For my support I use wonder bars from the guinea pig cage store (you can find them here:  http://www.guineapigcagesstore.com/candc-wonder-bars#.Ut7wyXn0BhA ). You can also use a 1.5"x1.5" piece of wood, wood dowel, or a broom handle. Just make sure you cut it down to size and then add a stopper to the end to stop the wood from slipping out and falling down.   You can do just one support bar and two grid supports instead.  There are lots of ways to set up a loft but this is how I did mine. Its very sturdy, cheap and easy to do.

On top of the support bars I have a support grid cable tied to just the right side of the cage (not the back). I use another grid bent into a U shape for my ramp. The ramp is cable tied to the grid.  Doing it this way means that all my supports are removable and swing up out of the cage for cleaning.  
Here's my supports propped on my wonder bars:

 Here is what the grid looks like laying on the wonder bars. Note you can do two support grids cable tied together and use only one support bar instead.  Alternatively, you can skip a coroplast tray in the patio if it's just for a fleece lined sleeping area. You can L bend grids to make a safety wall. Lay a flat sheet of coroplast or vinyl down on the coroplast and top with a fleece pad or fleece flipper.  One day I may experiment with this idea but for now I use coroplast trays for the floors in my patios.


Here is my grid support and ramp up and out of the cage for easy access. 
My wonder bars have also been removed in this photo:

Pretty cool huh?

My cage gets a kitchen!!

Three piggy piggies in a 2x4 cage gets stinky fast.  The solution? A disposable pellet kitchen! I started out using feline pine (original formula NEVER the clumping kind) because it was faster to order on Amazon than it was to go out to the feed store and get horse stall pellets.  At 18.95 for a 40lb bag it was worth it to have it delivered to my door.  In my opinion there is nothing better for odor control than disposable pellets.  If you like the scent of pine wood then pellets are awesome. If not then consider paper pellets like yesterdays news, I've never personally tried them but I hear good things.  I am not a fan of Carefresh. I know lots of people like them but Im not one of them. I find them messy and quick to get stinky, especially if you use them for just a kitchen area, the pigs will track a lot of the mess onto the fleece. It still happens with the pellets, since those break down into sawdust when they get peed on but I'd still rather clean up sawdust than extra pee and poop on the fleece.  One day when I get brave I will show you the cage after just 24 hours of pooping piggies.

 To encourage my pigs to use the kitchen I hung some fleece forest in the kitchen using my patio supports. It works well and since their food and water is in the kitchen area that is where my pigs congregated most when my cage was this configuration.

  Here is a photo of the cage with the lid closed, as you can see my patio is much lower than a second story loft. I did that so I wouldn't have an extended level jutting out of the top of the cage. My cage is next to my couches so I use the top of the cage for the occasional drink and to hold my TV remote.  Another after effect of expansion... my lid support bar is no longer long enough to support my lid!
The remedy?   Add more wonder bars from the cage store.
Also worth mentioning: Check out these awesome storage bins in my stand. 
They are also from the guinea pig cage store and come in a wide variety of colors. 
They are 2 grids deep and hold a whole lot of fleece!


Cage Expansion

I expanded from a 2(grid)x3(grid) size cage to a 2x4 
when we added Agnes and Margo, two coronet piggies, to our family.

 Of course I didn't think about the fact that my wire closet shelf lid 
was sized to a 2x3 so I needed to do an add on.

 And so was my fleece liner!  So I had to do some overlapping with
some extra patio liners until I could make longer liners.  
A good thing to remember when you expand...
don't forget your liners need to expand too!


My first C and C in all its decorated and remodeled glory

I have made so many changes to the piggies cage,  I probably change it 2-3 times a month.  Here are all the set ups I had with my 2 x 3 cage: 

Homemade fleece flippers and free standing fleece forest 
(AKA the fleece carwash as my husband liked to call it)


Brown chevron fleece full cage liner 
(2 layers of fleece with a layer of uhaul recycled denim pad inside for absorption)  
I made the fleece TV cover.  The pink futon I bought from the guinea pig cage store.

Pink chevron full cage liner, new 1/2 grid height sleeping patio (also known as a Patio)
homemade pink tunnel, purchased vintage circus tunnel and cosy from a seller on Etsy


Where the wild things are fleece theme. Full cage liner, assorted pads,
a coordinating tunnel, and a no sew fleece bed (tutorial coming soon)
All handmade by me.


Hello Kitty and pink chevron fleece theme. All items handmade by me


Vintage comic book Mickey Mouse theme
All items handmade by me

I hope you are enjoying all the variations of my 2x3 cage. Feel free to leave comments and questions!