background wallpaper

Wednesday, January 22, 2014

Catwalks!

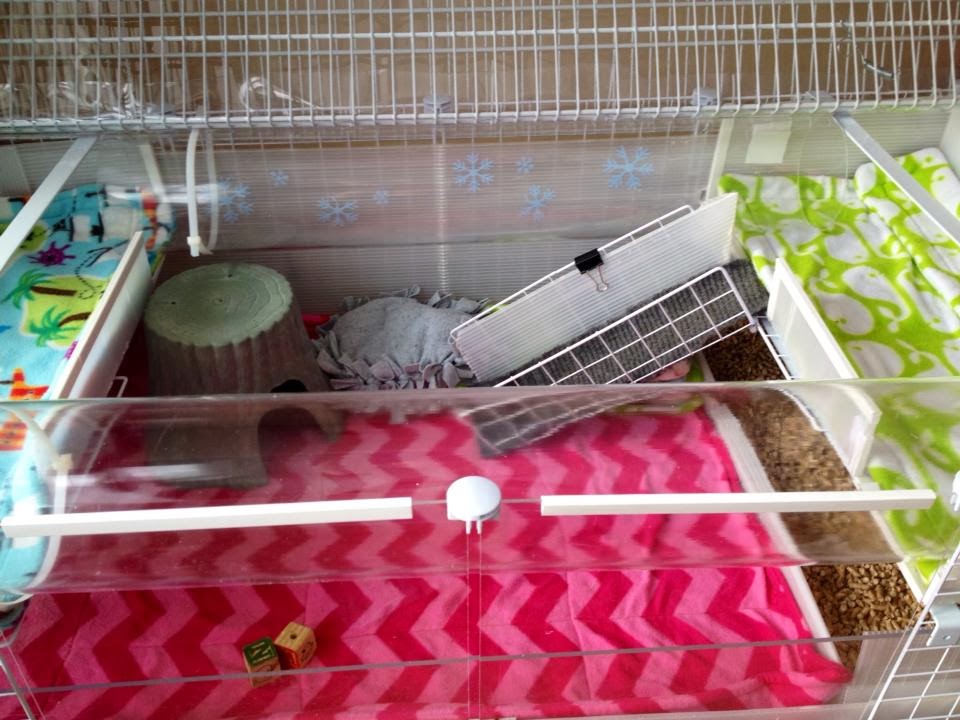
I still liked the idea of the racetrack upper level but the tubes were getting to be a hack to clean so I thought I'd see how I liked a gridded catwalk instead.  True to it's name my cat had to investigate soon after I installed it:


The piggies seem to prefer the catwalks to the tubes, they are flat, wider and plusher.


I finished switching out the tubes for catwalks last week.  I really like them.  They are super easy to clean (much more budget friendly for anyone who wants to try this in their cage) and although the cage looks like it would be complicated and time consuming to take apart it is incredibly fast!  Both patios, the ramp and one catwalk are all able to come up and out of the cage.  The one catwalk in the back had to be permanent because of the lid but it is very easy to work around.


One small challenge I came across is that my foxy tube liners were too narrow for the much wider catwalks so I quickly sewed up a couple of wider cat walk liner sets.


Piggy cage gets tubular.

I stumbled on a really cool cage using clear acrylic tubes and PVC on the outside of the cage to create a habitrail style racetrack.  As soon as I saw it I got obsessed with the idea of adding one to my cage.  I bought a 6" diameter, 6' acrylic tube from www.usplastics.com and had them cut it into two 3' sections.  After giving it some more thought I realized It would cost less if I didn't put the tubes on the outside of the cage.  I brainstormed a few different ideas and then decide to do a trial run with one tube connecting to a second patio. I wanted to see how difficult it would be to maintain.  

The piggies loved it and it worked well and looked super cool:


It wasn't very long until I decided to complete the racetrack and add the second tube:
 I had it like this for a couple of weeks but soon got tired of cleaning out the tubes. They are big enough to put an arm in, but they get messy on the insides and while it does look super cool and work great, I just didn't feel like I wanted to keep maintaining it.   My next variation on this idea was to swap out the tubes for a set of U bent grid catwalks.  See my next post for photos and details.


Tuesday, January 21, 2014

All lit up

Here's the cage with the lights on. Snazzy huh?


Winter is Coming... Brrr...

When I started thinking up different holiday fleece themes for the cage I was originally going to go with something Christmasy. After giving it some more thought I realized that December 26th my Christmasy themed fleece was going to have to go away until next year so I chose instead to do something wintery.  I picked out Winter Raccoon fleece and a Marshal Ferret blue igloo. I added some tube lights, which I plan to keep up until they no longer work because piggy lights are awesome all year long.  


 mmm.... peppers.

I even topped their wood pellets with some nice soft white care fresh "snow". 
I learned something this day.  I don't like care fresh. Dare I say I loath the stuff?
It gets smelly, tracks ALL OVER THE PLACE and like real snow, not so pretty when it's yellow. 

Here is Margo enjoying it though:
   (A quick disclaimer: ALWAYS cover your ramps, it is very dangerous for them to climb bare wire, they could break a leg. I took it out for the photos so you could see them better and then the ramp liner went back in)

 Then again she will plop down just about anywhere. Isn't she GORGEOUS!!


Marshal ferret blue igloo hidey, not my favorite. They loved it, especially Agnes, 
but the removable floor got peed all over so I ended up taking it off. 
Then she would flip it and turn it into a cage and pee on the side.  

 I added some removable vinyl snowflakes I got on ebay to the cage.  BIG MISTAKE these things are a real pain to remove.  If you want to put in removable decals stick with the peel and stick kind. Avoid the ones you have to smooth on with a credit card.  I'm still peeling off snowflakes!  
I have very little patience. 


Kitchen expansion and Plexiglass viewing windows!

Probably one of my all time favorite cage modifications I have ever done was adding plexiglass viewing windows to the cage.  There are actually FOUR different windows in this cage design. The two main ones are easiest to see.  

Can you spot the plexi windows?
 -Two grid replacement windows in the middle front (thats the easiest one to find).
- One loooong viewing window built into the main coroplast tray, so while it might appear my coroplast try is only 2" high in the front of my cage, it's really 6" high all the way around.  I cut out most of the front coroplast and then installed a plexiglass window using velcro inside the tray. I left a small lip on the front and 6" square on each side to mount the velcro to.  If you look really close in some of these photos you will see the second window at the bottom of my tray.
- yet another window is cut into the front wall of my kitchen.  I made this one the same way as the larger window in my coroplast.  Next time I take it out of the cage I will get some close ups to show you. 

I bought my plexiglass panels precut from tap plastics 
( http://www.tapplastics.com/product/plastics/cut_to_size_plastic/acrylic_sheets_clear/508 )

My grid windows fit inside my connectors. If you want to do this you need 1/8" thick plexiglass (acrylic) cut to the size of your grids. Mine are 14" x 14" You could choose to do the whole front of your cage this way.  If you don't need them to fit inside the connectors go up to at least 3/16" thicker or more.  The thicker the better.  I choose to do my windows this way because if I scratched or damaged the windows I wanted to be able to replace them cheaply and easily.  I also wanted to use the connectors so there is more airflow in the cage. 


Here's my little cuties all grown up. Awe!

I tried expanding my kitchen for a while. Remember that 2x2 quarantine cage I showed you, this was the tray for it. I modified it, cut it down to a 1.5x2 and added the front plexiglass viewing window.


The nice part about the bigger kitchen is my 2x3 fleece fit in with some room to spare. The downside, even with 3 pigs in there, they weren't really soiling the whole thing so I decide to go back to a 1x2 kitchen.

 You can see the viewing window in the front of the kitchen here.  So what you are looking 
at right next to Mabeline is actually THREE layers of plexiglass right there!


 All this fun stuff and the cage is still only one grid high

Monday, January 20, 2014

Installing removable patio supports

This is how I put in my patio supports.  First a quick explanation on the difference between a patio and a loft.  They are pretty much the same thing, only a patio is placed above the ground level 1/2 a grid high up. It doesn't require extra grids or a second higher level like a loft does.  

My cage has a patio. It starts with support bars to hold up the patio. For my support I use wonder bars from the guinea pig cage store (you can find them here:  http://www.guineapigcagesstore.com/candc-wonder-bars#.Ut7wyXn0BhA ). You can also use a 1.5"x1.5" piece of wood, wood dowel, or a broom handle. Just make sure you cut it down to size and then add a stopper to the end to stop the wood from slipping out and falling down.   You can do just one support bar and two grid supports instead.  There are lots of ways to set up a loft but this is how I did mine. Its very sturdy, cheap and easy to do.

On top of the support bars I have a support grid cable tied to just the right side of the cage (not the back). I use another grid bent into a U shape for my ramp. The ramp is cable tied to the grid.  Doing it this way means that all my supports are removable and swing up out of the cage for cleaning.  
Here's my supports propped on my wonder bars:

 Here is what the grid looks like laying on the wonder bars. Note you can do two support grids cable tied together and use only one support bar instead.  Alternatively, you can skip a coroplast tray in the patio if it's just for a fleece lined sleeping area. You can L bend grids to make a safety wall. Lay a flat sheet of coroplast or vinyl down on the coroplast and top with a fleece pad or fleece flipper.  One day I may experiment with this idea but for now I use coroplast trays for the floors in my patios.


Here is my grid support and ramp up and out of the cage for easy access. 
My wonder bars have also been removed in this photo:

Pretty cool huh?

My cage gets a kitchen!!

Three piggy piggies in a 2x4 cage gets stinky fast.  The solution? A disposable pellet kitchen! I started out using feline pine (original formula NEVER the clumping kind) because it was faster to order on Amazon than it was to go out to the feed store and get horse stall pellets.  At 18.95 for a 40lb bag it was worth it to have it delivered to my door.  In my opinion there is nothing better for odor control than disposable pellets.  If you like the scent of pine wood then pellets are awesome. If not then consider paper pellets like yesterdays news, I've never personally tried them but I hear good things.  I am not a fan of Carefresh. I know lots of people like them but Im not one of them. I find them messy and quick to get stinky, especially if you use them for just a kitchen area, the pigs will track a lot of the mess onto the fleece. It still happens with the pellets, since those break down into sawdust when they get peed on but I'd still rather clean up sawdust than extra pee and poop on the fleece.  One day when I get brave I will show you the cage after just 24 hours of pooping piggies.

 To encourage my pigs to use the kitchen I hung some fleece forest in the kitchen using my patio supports. It works well and since their food and water is in the kitchen area that is where my pigs congregated most when my cage was this configuration.

  Here is a photo of the cage with the lid closed, as you can see my patio is much lower than a second story loft. I did that so I wouldn't have an extended level jutting out of the top of the cage. My cage is next to my couches so I use the top of the cage for the occasional drink and to hold my TV remote.  Another after effect of expansion... my lid support bar is no longer long enough to support my lid!
The remedy?   Add more wonder bars from the cage store.
Also worth mentioning: Check out these awesome storage bins in my stand. 
They are also from the guinea pig cage store and come in a wide variety of colors. 
They are 2 grids deep and hold a whole lot of fleece!